Wednesday, April 29, 2015

Cricut New Arrival Train Card for a baby boy

I have made this card before for his big brother and the parents requested another card to match.


I used my Cricut Explore with the New Arrival and Mickey Font cartridges in Design Space. I had to use the desktop computer app to hide the contours and then saved it and opened it on my iPad to finish the design and cut the project. I have never liked using a computer so the app being so smooth and easy to use, is always my preference! 

I just LOVE how the Explore can cut and draw so efficiently! Look how beautiful the writing looks!


I wanted to be able to cut separate train carriages in different colours without cutting the whole train in each colour. 

Here is a screen shot of the iPad app showing how I worked out the design and matched the papers I had with the colours, and got the placement of the words for the Explore to write with a pen. 


Maybe one day they will allow the images on the app to be filled with a pattern to help with planning a layout! That would be fantastic!!! 

Thanks for looking,
Happy Crafting

Sharon Skippy 

sharonskippy@outlook.com

Simple Wedding card

I was going to make a card with a favourite stamped image, but I messed up my first attempt and then spilled my blending solution, so I whipped up this simple card on the iPad Design Space app for the Cricut Explore. 

I sliced the ampersand out of the Kraft cardstock and inlaid the white cardstock to leave the card smooth for the names to sit flat on the finished card. 


The block letters and ampersand are from a system font on the iPad called Palatino and the cursive font is called Samantha Font which I purchased online. 

Here is a link to a fantastic tutorial on using the Samantha Font in Design Space. My friend Narelle is my go-to girl for all my DS know-how! 


Thanks for looking,
Happy Crafting

Sharon Skippy :)

Sharonskippy@outlook.com

Baby boy Kadoodle Bug card


This adorable little bear is a file from Kadoodle Bug Designs called "School Rules Bear" and I removed the ruler and lettering and added the baby boy's name to personalise it :) 


The papers are Doodlebug from my overflowing stash of papers. 
All the plain cardstock is Close to My Heart and inked with co-ordinating coloured inks using daubers. 
This cardstock cuts beautifully on the Cricut Explore as does everything I cut on this amazing machine! 

Thanks for Looking
Happy Crafting

Sharon Skippy


Sunday, April 26, 2015

A Berry Cute Tea Cup Teddy :)

I just love this file from Kadoodle Bug designs, he is a freebie released with a whole set of cute new images called Katoodles.
I love when I have no crafting plans and can just make whatever I feel like at the time, this cutie really appealed to me and doesn't even need a sentiment. It is a card that you can use for any occasion that needs an adorable bear in a cup! 


Thanks for stopping by,
Happy Crafting...
Sharon Skippy :)

Thursday, April 9, 2015

Welcome baby Jack!

I was asked to make a baby card for an adorable baby boy called Jack...I love when the baby name is a short one because it can be big and bold and I get to play around with colour and patterns...


I used Doodlebug patterned papers from my stash of baby papers and Close To My Heart cardstock for the base and mats. 
The letters JACK are cut on my Cricut Explore and I used the Cricut Mickey Font cartridge. 
The small letters are cut using Memory Box die Alphabet Soup.
I hand cut the tag and used an old Impression Obsession alpha stamp set for the details on the tag. 
The stitching is hand doodled with a fine liner. 

Thanks for looking as always...and if you don't have a CTMH consultant in Australia, you can support my sister and I by shopping at tracyskipworth.ctmh.com.au
If you are a local West Aussie in and around Perth, you can contact us to book a gathering demo or join us at a crop.

Sharonskippy@outlook.com


Birthday wishes from Eeyore

My best friend LOVES Eeyore so I made this cutie from Cricut Pooh and Friends to put on her birthday card. What else do you give a bestie? An Eeyore Hallmark Itty Bitty of course! 
I used Close To My Heart cardstock as always to cut on my Cricut Explore. The CTMH cardstock cuts like butter and 

If you don't have a consultant and wish to purchase CTMH supplies in Australia, please support my sister and I by shopping at tracyskipworth.ctmh.com.au
If you are local in Perth, Western Australia, contact us for a home workshop or attend one of our crop days... We always love to craft and chat with new friends :)


Thursday, March 11, 2010

Wedding Cards

I was asked to make some wedding cards, usually I have a simple design that I use for many weddings, but I had to make 3 cards for the one wedding... one from the Bride's mother, one from the Grooms mother, and one from mine...
Here's a burgundy and gold themed card for the Bride's mother... she specifically asked for it to say "To our Daughter and Son-in-law"
Bling is from Kaiser, Flowers are from Prima, Patterned paper is Bo Bunny.
Heart is cut from Sweethearts Cricut Cartridge at 4.5"
Tag is from Fabulous Finds Cricut Cartridge at 2"
I printed on vellum on my inkjet printer and had to wait ages to let it dry, but it was easier than cutting the letters on the Cricut!


Here's the card I did for the Groom's mother. The beautiful background velvet paper is from Prima, as are the flowers and pearls.
The bride and groom is cut from Disney Princess Dreams Come True Cricut Cartridge at 5"
The words are cut with Gypsy Font at 0.48", with the shadow welded... OMG this was fiddly to get right!!! I finally had to use a white gel ink pen to complete a few of the letters that kept tearing! But you can't notice, thankfully!!!


The 3rd card from my mother ended up being a card from my stash of wedding cards as I was up until nearly 4am finishing these!!!
Thanks for looking and Happy Crafting
Sharon :-)

Sunday, February 28, 2010

Easter Bunny Baskets!!!

I am teaching a kids craft class at Mister Turtle in a few weeks... we are making these cute Easter Bunny baskets and filling them with decorated plastic eggs ready to be filled with candy!

I've made these lots of times before, and my kids always love making these baskets, so I'm sure other kids will have lots of fun with them too!

The bunny head is cut from Doodlecharms Cricut Cartridge 3.5" on blackout feature, as I like to draw my own face! and the Eggs are also from Doodlecharms on real dial size at 1"
Even has a cute fluffy tail and feet on the back!!!

Thanks for Looking & Happy Crafting!

Sharon

A card for Nick!

Nick is in hospital so I thought I'd make him a get well card... he loves music, so I thought I'd have a play with the papers in the DCWV Generation Tech stack... I LOVE this stack!!! The blue metallic cardstock is from the Citrus stack... I love the bright metallic and glittered sheets in this stack...

I love making Easel cards and thought these cuts from the Tech stack would look cool if the Record player was on the flat part and the rest was on the easel part...
The font is cut on my Gypsy from Sesame Street Font cartridge... I cut the edge of the 'rainbow' with Stampin Up scallop edge punch... I think it turned out pretty cool.... it was fun to make!!! Not often I get out the scissors instead of my Cricut for cutouts on a card!!! :-)

Thanks for Looking and Happy Crafting!

Sharon

Ballet cards...

I have donated a basket of ballet cards to my DD's ballet school... they have just set up a new studio which has 3 dance studios and proper change rooms, waiting rooms and reception. I noticed that they have a glass display cabinet near the counter, so I thought they'd like to sell some cards for fundraising... it's always hard to get a nice ballerina card, so they are selling well.
I've made a selection of silhouette cards using SCAL and Nestibilities... I made a variety of colour combos, my favourite is the silver and grey but I forgot to take a photo before I sent them in!!!


I also made a selection of Hello Kitty ballerina cards in different colours... the purple cards are cute, but once again, I forgot to take a photo!!!

Thanks for Looking and Happy Crafting!

Sharon

Tuesday, January 26, 2010

Happy Birthday to ME!!!

My parents so lovingly gave me airfares to the East coast of Australia, Queensland to visit my Cricut MB friend FiFi... Mum's stuck with my monster children for a whole week... she'll need a holiday by the end of the week!!! But it's the BEST birthday present EVER!!! Oh how I needed a week away from reality and this is certainly the best place to come...

Today is Australia Day and also my 30th Birthday... I'm having the best time over here in QLD... lots of fun, crafting, laughing, eating and drinking... wish I didn't have to go home! Fi and her family have been so generous letting me stay with them for the whole week...

Fi made me this amazing Kaiser album... all the local mb girls are going to sign it...
Here's the inside... now I know why she insisted I go shopping with her DH and DD... she used MY Sweet Treats cartridge for this cut!!! LOVE IT!

Happy Crafting... and enjoy your Australia Day!

Sharon, xxx

Tuesday, January 19, 2010

A very GIRLY Any Occasion card - Forever Young Cartridge

I was a very bad girl and opened my parcel early... my birthday is next week on the 26th which is Australia Day... I was given permission to order 4 new cartridges... Oh My, it was so hard to choose!!!

I have fallen in love with this very SEXY Cricut cartridge called Forever Young...

I wanted to play with it yesterday as friends came to scrap, but the power went out and spoiled all our fun... seems everyone decided to have their airconditioners on as it was 44 degrees (111F for my USA followers!) It was NASTY, the air was HOT and no sign of a breeze... but at least I had my Gypsy and could have some fun while the other girls scrapped by torch light!!! (realised this morning that we'd cut some 'pink' card that was actually ORANGE... oops!!!)

I cut the girl at 4"
The paper is DCWV Glitter Stack and All Dressed Up stack
Flowers & Bling is from Kaiser and my stash
Nestibilities long rectangles
Cuttlebug embossing folder is called Argyle

I think this might be the first card I've made WITHOUT a sentiment, but I didn't think it needed one... I think it can be used for any occasion...

Thanks for looking & Happy Crafting!

Sharon

Friday, January 15, 2010

Kitchen Tea Easel Card

I was asked to make a Kitchen Tea card... I've never made one before so I had fun experimenting!
The Teapot is from Disney Princess - Dreams Come True Cricut Cartridge at 3"
The Teacups are also from DCT at 1.5"
The cupcakes are from Gypsy Wanderings at 1"
Cardstock is from DCWV Sweet Stack.
Long Rectangle Nestibilities for the sentiment, printed on MS word.
Border punch is from Stampin Up.
Lots of stickles! Kaiser pearls, ribbon from my stash, D'vine swirls embossing folder on the teapot, flowers are Prima.
Here's a side view... showing how it stands up...

Here's a view from the front:
Here's the card flat as it would sit in the envelope:
Thanks for looking & Happy crafting!
Sharon


Elmo 1st Birthday Card

Just a quick card for a 1 year old boy...
Sesame Street Font Cricut Cartridge for Elmo... how cute is he!!
Pooh Font Cricut Cartridge - marker feature for "Emanuel" shadow welded on my Gypsy.
For the background embossing, I first embossed the Cuttlebug 'Spots and Dots' folder top and bottom, leaving enough space for the letters, then I used my scorpal for the lines and embossed the dots last using one of the borders sets, I'm not sure which set it's from, they are all together on my shelf!
I haven't used any foam mount, this card is flat, which is unusual for me... I left it flat just in case it was to be put in a scrapbook, as it was mentioned to me that his mother is a scrapbooker!

Thanks for looking & happy crafting,

Sharon

Thursday, January 7, 2010

Get Well Soon card

I felt like making something bright and cheery for someone special who's in hospital... my kids can write on the inside and decorate the envelope before giving it to her... it's a quick and easy card done on my Gypsy.

Well it took a little longer than it should due to the multi page option not working and the open as template cutting things that it shouldn't... so it's missing a few bits I would have liked to add!!!
(Hurry up Provocraft and update the Gypsy software!!!)

I used Hello Kitty Greetings for the flower
Mickey Font for the letters.
Paper is really glittery so it was really hard to photograph...
Next time I'll use a different font... Mickey is just a habit... the card is actually a bit flimsy...
Since making shaped cards is new for me, I'll be able to work on that!!!


Happy Crafting & Thanks for Looking!

Sharon

Sunday, January 3, 2010

Buggy Bling!!!

I was inspired by the Bazzill Jewel Templates that I purchased yesterday... so I decided to make my own on my Gypsy... What better project to start with than something to decorate my Cricut Expression as she's been jealous of everyone else's blinged bugs lately!!!

I used the Cricut Bug Head Logo on Store Front Cartridge, which I don't own, but I used it as a template and then used circles from Plantin Schoolbook to make my bling template. I then cut it out on vellum and laid it on my Expression as a template to stick Kaiser rhinestones.

I think Miss Pixie Gypsy is pretty clever!!! :-)


If I can work out how to share the file, I'm happy to share... I'm going to make a few tiny modifications first though... this was my first attempt!

HERE'S THE LINK TO THE FILE FOR FREE DOWNLOAD.


Thanks for looking and happy crafting!
Sharon

Friday, December 25, 2009

How I made my Gypsy Stylus Charms...

Hi Everyone,
I've been getting requests to show how I made the Charm for my Gypsy Stylus.

This is my first ever beading project so I have no idea of the technical terms... I'll do my best to explain...

You will need:
Pre-made lanyard string (I found a pack of 10 at a bead store or at a hobby store in the bead section)
a piece of wire with a looped end (I bought them like this but you could make one)
a jump ring (circle of wire that's not closed)
selection of pretty beads
and a pretty charm!
You will also need:
Round nose pliers and flat end pliers, if one of these doesn't have a wire cutter, you'll need a cutter too!

Thread your beads onto the wire up to the loop.
Then you'll need to cut the excess wire to leave just the width of your pinkie finger.

Use the round nose pliers to loop the other end of the wire and then bend it back on itself.
Attach your charm to the open loop and then close it off... (I'd removed the extra loop on the charm... but it's still in the photo)
Then use the jump ring to connect the lanyard string to the looped wire.
Do this by hooking it through the lanyard first and then loop is easy to add on. Use both pliers to close the ring... the flat end ones to hold it steady and the round ones to close the ring.

Thread the string through the loop of the stylus.
Then thread the charm and beads through the string loop... pull it tight.

All done... now you'll find it easier to pull the stylus out of the Gypsy and it'll look fantastic too!!!

Thanks for looking & happy crafting!

Sharon

Monday, December 21, 2009

My first Easel Card

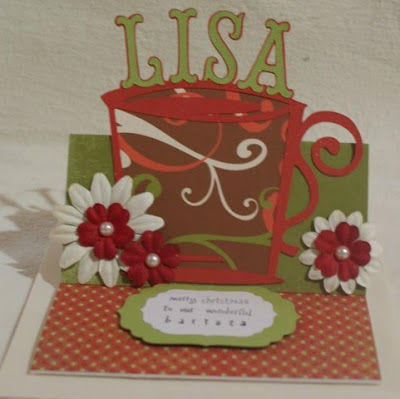
Dad asked me to make a card for his Barista...
I like to try a new technique when I make a 'one off' card.... I love looking at all the easel cards on blogs, Cricut messageboards and SplitCoastStampers.

I used my Gypsy to weld letters from Storybook Cartridge to the mug from Graphically Speaking. Stamped sentiment is made up of words from 'Impression Obsession' sentiments set, stamped on label nestibilities.
The flowers and bling are Kaiser.
Sentiment reads: "Merry Christmas to our wonderful barista"


View from the side:

Because the card is going to be signed by a few people, the base opens up so there is a whole panel to write on... I forgot to photograph it open!

Thanks for Looking & Happy Crafting,

Sharon

Friday, December 18, 2009

Simple Wedding cards

I started these a while ago... and since it was such a nasty hot day I thought I'd go back and finish some projects instead of trying to use my melted brain to create something new!!!

I used the Cuttlebug to emobss the wedding cake from Sizzix Textured Impressions wedding kit, dots are from the dots and flowers kit, and the hearts are done on the Cuttlebug also using the Nestibilities hearts...

The stamped sentiment is from the Impression Obsession Sentiments set.... I love this set as you can mix and match all the words to create a perfect sentiment for any occasion.

Very simple, yet I really like the white embossing on wedding cards with coloured metallic paper.


Thanks for looking & happy crafting!
Sharon

Wednesday, December 16, 2009

Phoebe's class Christmas Gifts 2009

This year Phoebe and I made "Sour Cream Containers" (tutorial can be found HERE)

It was actually much quicker than making cards... took about 3 hours in total to produce 30 of them! We started over a week ago, but the project was put aside to work on the glass etching.

I was able to churn out the tags super fast on my Gypsy using Winter Woodland Cricut Cartridge and Phoebe did the glueing... then she wrote "from Phoebe" on the backs of all the tags. She ticked off the list of her classmates as I wrote the names on the front of the tags...

She also helped fill them with jelly beans and then turned the handle on the crimper to seal the ends. Phoebe helped me sort the little bells and put them on wire rings to hang on the tags... the tags can be pulled out of the hole in the container and hung on the Christmas tree once it's been ripped open and the jelly beans eaten!
Here's a close up...


We had lots of fun doing this project together...
Thanks for looking & happy crafting,
Sharon